
 For the first recipe of 2013, the bakers of Tuesdays With Dorie are tackling Pizza with Onion Confit courtesy of Steve Sullivan, founder of the Acme Bread Company of Berkeley, California. Like many in the Bay Area culinary scene, Steve can trace his roots to a small restaurant occupying a converted Arts and Crafts home on Shattuck Ave. While working at Chez Panisse as a busboy in the late 70s, Steve became the first in-house bread baker; his stint coincided with the opening of the Cafe at Chez Panisse, which features a wood burning oven and pizzas unlike what had been seen in this country before. This Pizza and its accompanying Onion Confit reflect that style of pizza, often absent a red sauce, and featuring ingredients and flavors associated more with the Mediterranean and the South of France than Italy proper.
I’ve owned Baking With Julia for close to fifteen years. Prior to joining Tuesdays With Dorie, I had baked no more than a handful of the recipes. But one recipe that I make regularly is Steve Sullivan’s recipe for pizza dough. While I haven’t literally made a ton of this dough, I expect at some point to reach that milestone. Through all those pizzas, I had yet to make the one simple pie described in this recipe. This week would finally be that time.
At this point, I would normally direct recipe hounds to the blog of a fellow baker wherein the recipe might be found. This week, I’m hosting, so the recipe is found at the end of this post. The efforts of other TWD bakers can be found here.
Most times that I make this pizza dough, I use Caputo ‘OO’ flour, a finely milled flour (‘OO refers to the grind) imported from Italy. For the last several years, I’ve also substituted as much as a cup of Extra Fancy Durum flour, which adds a yellowish tint to the dough and seems to lend a bit of extra chew to the finished crust. This week I changed things up yet again to experiment with a higher gluten flour and longer fermentation times, in an attempt as Peter Rheinhart writes in The Bread Baker’s Apprentice, “to coax flavor from the grain.”
 This recipe starts like most bread doughs with hydrating and proofing yeast in tepid water. After five minutes or so, a bit of bubbling and the smell of fermentation confirms your yeast is active. A few tablespoons of olive oil lend elasticity to the dough, especially important when using a higher protein flour.
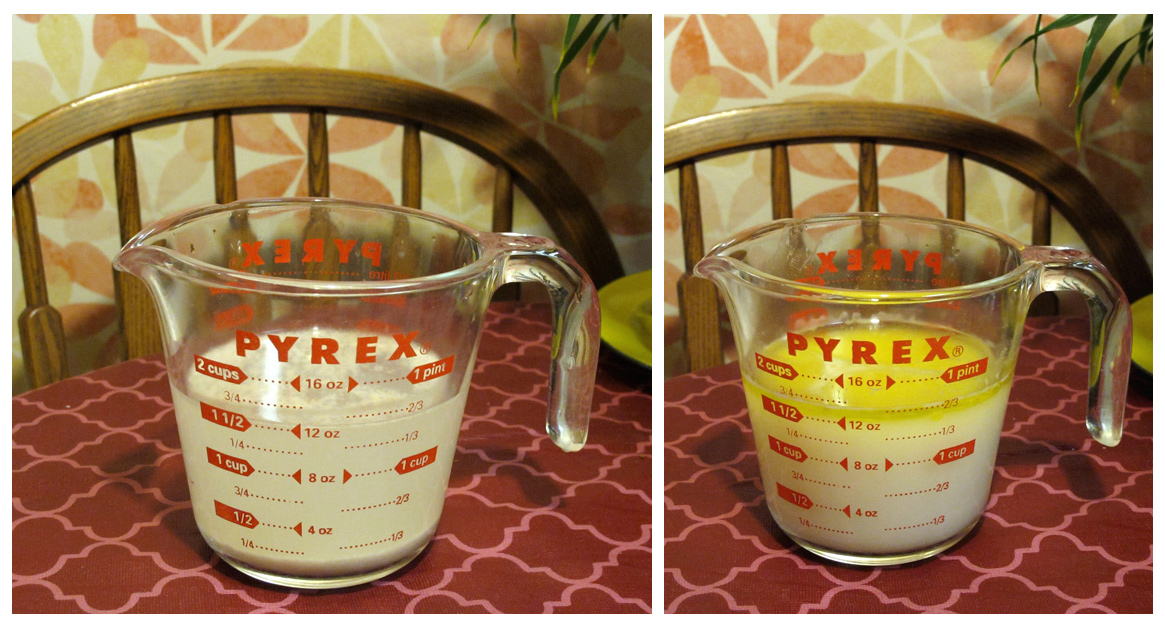
At this point, about half the flour is added to build a sponge, or pre-ferment, the purpose of which is to build flavor in the final dough. As the flour sits with water, a number of complex chemical reactions take place, the most visible of which is the yeast converting sugars to alcohol and carbon dioxide gas. Slower reactions involve enzymes which convert some of the starches to sugars and other flavor compounds. The recipe calls for the sponge to rise an hour and a half at warm room temperature. My sponge had an additional overnight cold ferment in the refrigerator. Colder temperatures reduce the yeast’s activity, while giving enzymes the time to catch up.
 Left to Right: Immediately after mixing; following 90 minutes room temperature fermentation; overnight cold ferment
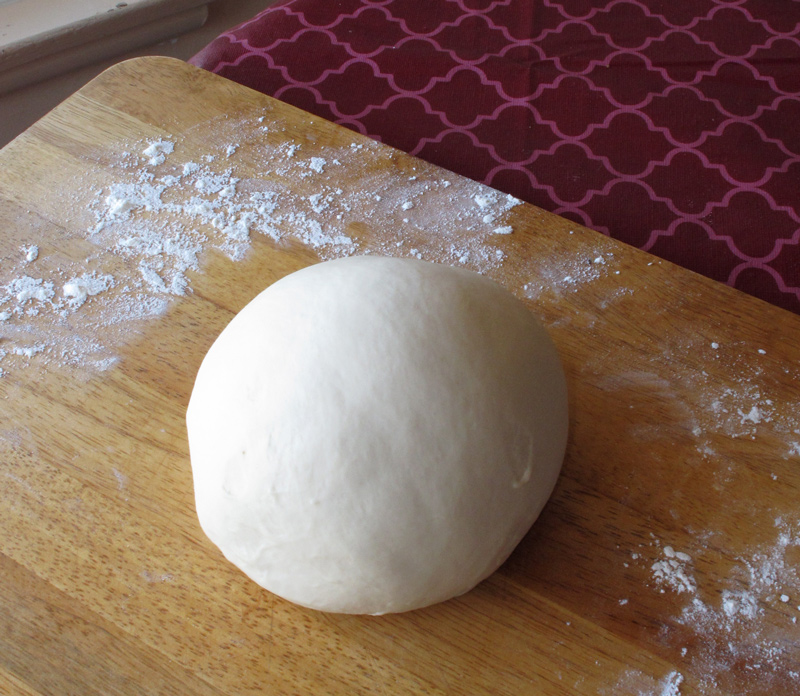 In the morning, I combined the sponge with additional flour and salt in the mixer and kneaded it into a finished dough. With the high-gluten flour, I noticed I had a much stiffer dough than I’m used to, even with only the minimum 2 cups of added flour. I wanted to give the dough a few turns by hand, but it was so much stiffer that I had to rely on the stand mixer for all of the kneading. I then shoved the dough in the refrigerator for about four hours, allowing it a final two hour rise at room temperature prior to shaping and baking.
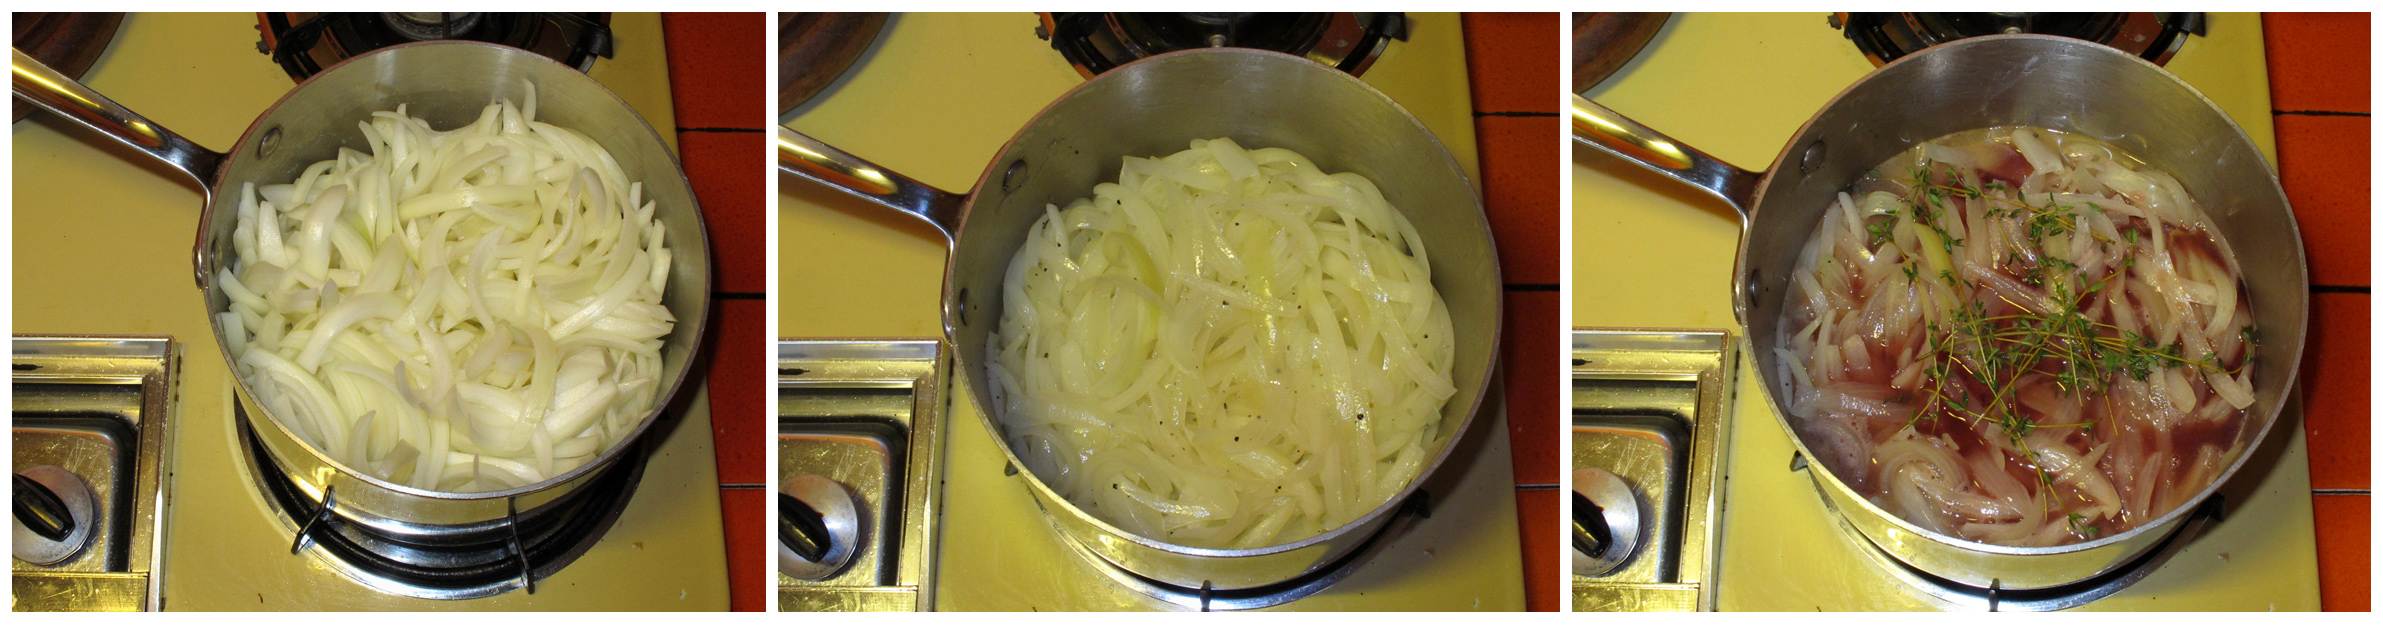 With the dough finished it was on to the confit. My default onion is white, and after slicing two and a half pounds of yellow onions for the confit, I’m convinced they bring forth more tears. Shallots do likewise, though their improved flavor makes them worth the tears. As I was cooking in my parent’s kitchen, I did not have a large, wide, heavy bottomed pot in which to slowly cook the onions. I’m sure this had something to do with the onions taking much longer than stated. It was probably 20 minutes before I added the wine, which itself took almost 90 minutes to reduce.
 After two hours, I ended up with about three cups of onion confit, stained pink from the Pinot Noir. Prior to adding the wine, vinegar, and thyme sprigs, my onions hadn’t really begun to carmelize. With a wider skillet, I’m sure the result would improve, however I’ve had the best luck carmelizing onions in an enameled Dutch oven, starting on the stove and slowly finishing in the oven over the course of about two hours. The confit would definitely benefit from this treatment.
 With the primary ingredients ready, it was now time to assembly the remaining ingredients and finish the pizza. More important than type of flour or choice of toppings, the first order of business was to preheat the oven and baking stone. Having baked pizza in electric and gas ovens, on baking stones thin and thick, I’ve come to the conclusion that the thickest stone in the hottest oven possible is the key to a great pizza. After pre-heating the oven to 500o F with the stone in place, I give the stone an addtional 20-30 minutes of oven time at full temperature. The initial searing of moist dough on a hot stone really sets the crust, as well as causing trapped gases in the dough to expand, helping to produce a thin and crispy bottom crust.
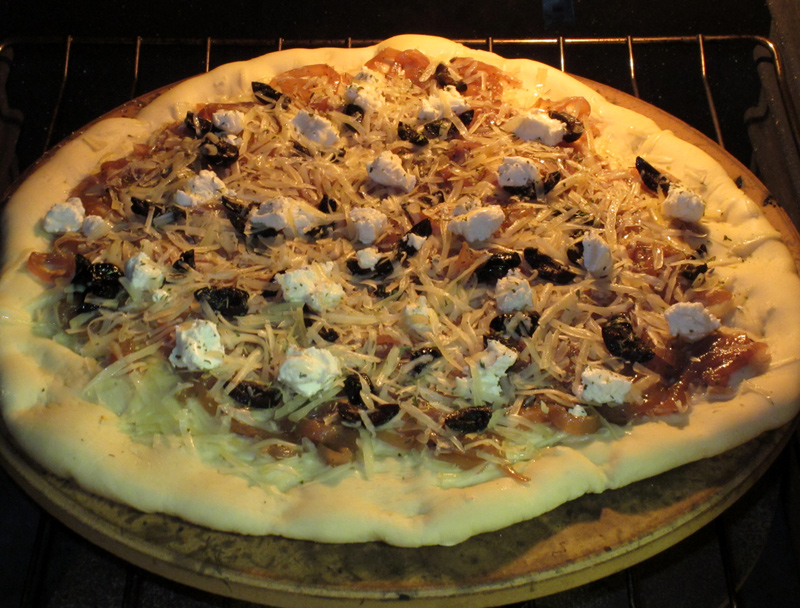
For toppings, I kept with the Provencal theme, adding clumps of soft chevre, quartered oil-and-salt-cured black olives, and a sprinkling of Herbs de Provence. Above and below the confit I added some Fontina Val d’Osta, without which the other toppings might not have stayed put.
 Working without a peel, it took a bit of effort to get the pizza onto the stone. I’ve had more than one pizza fail to transfer over the years. On one occasion, I managed a version of the classic parlor trick in which the table cloth is removed, leaving the place settings intact. Only in my case the dough stayed on the peel, while all the topping ended up on a hot stone.
After observing a Costa Mesa pizzeria, I made it part of my normal practice to build a pizza with only sauce and a bit of hard grating cheese on the peel, transferring that onto the stone for a short bake of two to three minutes. Removing the par-baked crust onto the peel, I then proceed with the remaining toppings before returning the pizza to the oven to finish baking. When working with a thin crust or a slack dough (often the case when using Caputo or a similarly non-bread strength flour), this two part process helps immensely.
I’ve also used parchment paper to top and transfer the pizza. At the high temperatures necessary for a crisp crust, parchment paper will burn around the edges, though not ignite. This can be avoided by pulling the parchment after 2 or 3 minutes in the oven.
The finished pizza was decent, though not up to par with the best I’ve made. Had I ended up with a wetter dough as per my normal routine, that crust would have been better. The onion confit also could have been better… a wider pan, more carmelization on the onions. However before I make the confit again, I’ll make many more pizzas with my preferred onion technique: thinly sliced white onions, salted and allowed to sit for about 15 minutes before squeezing excess moisture with a towel.
Pizza with Onion Confit
Makes 2 large pizzas. Here’s a dough that has enough texture and flavor to hold its own under any topping you choose, whether it’s the classic tomato and cheese or this Provencal-inspired onion confit. Opt for the confit and you might want to make it as soon as you set the sponge aside to rise, since it needs to cook for about an hour and then cool. Of course, you can prepare it a couple of days ahead and store it in the refrigerator until needed.
If you’re planning to make the Mixed-Starter Bread (page 113), save a piece of this fully risen dough to serve as the “old dough” in the first of the starters.
THE SPONGE
1 1/2 teaspoons active dry yeast
1 1/2 cups tepid water (about 80o F)
2 tablespoons olive oil
2 1/4 cups unbleached all-purpose flour
Place the yeast in a medium bowl (you can use the bowl from your mixer) and add the water, stirring to dissolve the yeast. Allow the yeast to rest for about 5 minutes, until it turns creamy. Stir the oil into the mixture and then gradually stir in the flour, mixing until well incorporated.
First Rise. Scrape down the sides of the bowl, cover, and let the sponge rest in a warm place (about 85o F) for about 1 1/2 hours, or until the sponge is very bubbly and has risen to about double its volume.
While the sponge is rising, make the onion confit.
THE CONFIT
3 tablespoons unsalted butter
4 medium onions (about 2 1/2 pounds total), peeled, halved, and sliced 1/8 to 1/4 inch thick
Salt and freshly ground black pepper to taste
1 tablespoon sugar
Fresh thyme sprigs or leaves to taste
1 1/4 to 1 1/2 cups red wine
1/4 cup red wine vinegar
Creme de cassis to taste (optional)
Melt the butter in a large heavy skillet and stir in the onions. Season with salt and pepper, stir, cover the pan, and cook the onions over low heat until they are soft, about 5 minutes. Sprinkle the sugar over the onions, stir, cover, and cook for another 5 minutes.
Add the thyme, 1 1/4 cups red wine, the vinegar, and a tablespoon or two of the creme de cassis, if you want to use it. Stir well and cook the mixture over the lowest possible heat, stirring from time to time, for about 1 hour, until just about all the liquid has evaporated. If the liquid has cooked off in half an hour or less, add a bit more wine. Turn the onions out onto a flat plate and let them cool to room temperature.
The onions can be made up to 2 days ahead and kept covered in the refrigerator. They should be brought to room temperature before they’re spread on the pizza.
THE DOUGH
The sponge(above)
2 to 2 1/4 cups unbleached all-purpose flour
2 to 3 teaspoons salt (depending on your taste)
If you didn’t make the sponge in your mixer bowl, transfer it to that bowl now. Use a rubber spatula to deflate the sponge, which will be sticky and loose, and fit the mixer with the dough hook. Add 2 cups of flour and the salt to the sponge and mix on low speed for 2 to 3 minutes. Increase the mixer speed to medium and, if the dough isn’t coming together nicely and cleaning the sides of the bowl, sprinkle in a little more flour by spoonfuls. Continue to knead on medium speed for another 4 to 5 minutes, until the dough is smooth and elastic. Although the dough may remain moist and a little sticky, you should be able to grip it without having it stick uncomfortably to your fingers.
Second Rise Place the dough in a lightly oiled large bowl, turn the ball of dough over so that its entire surface is moistened with oil, cover, and allow to rest in a warm place (about 85o F) for 1 1/2 hours, or until it has doubled in bulk and holds an impression for a few seconds when you prod it gently with your finger.
TO FINISH THE PIZZA
The onion confit (above) with olives, goat cheese, and/or Parmesan cheese(optional) — or any other topping you desire
Position a rack in the lower third of the oven, fit the rack with a baking stone or quarry tiles, leaving a border of at least 1 inch free all around and preheat the oven to 475o F. Rub a baker’s peel with cornmeal and set aside until needed.
Shaping the Dough Turn the dough out onto a lightly floured work surface (snip off a small piece of dough to save for the Mixed-Starter Bread if you want) and divide it into two pieces. You’ll probably have to bake the pizzas one at a time, so keep one piece covered while you work with the other. If you do not want to make two pizzas at this time, wrap one piece of dough tightly in plastic and store it in the refrigerator, where it will keep for a day or two, or wrap it airtight and freeze for up to a month. Thaw frozen dough, still wrapped, overnight in the refrigerator. Bring the chilled dough to cool room temperature before shaping. Shape the dough into a ball and then flatten it into a disk. To form the pizza, you can either turn and stretch the dough, stopping to allow the dough to rest for a few minutes if it springs back readily, or roll it out with a rolling pin. Either way, work the dough until it is about 1/4 inch thick (you can make it a little thinner if you prefer) and transfer it to the peel.
Topping and Baking Top with half the cooled onion confit and any or all of the optional ingredients, or the topping of your choice, leaving a 1-inch border around the rim of the pizza, and slide the pizza into the oven. Bake for 13 to 15 minutes, or until the topping is bubbling and the uncovered rim is puffed and beautifully golden. Repeat with the remaining dough and topping.
Storing Pizza is at its prime piping hot from the oven — don’t even think about reheating it.
Contributing Baker STEVE SULLIVAN
My notes:
For a more manageable thin crust pizzas, I increase the dough by 50%, dividing the result into four portions.
Extra fancy durum flour (finely milled Semolina) makes an excellent substitution for some of the flour in the dough.
Contrary to Steve’s admonition, not only do I think about reheating this pizza, I actually follow through. It’s best reheated on a hot stone, and failing that in a good toaster oven, wrapped in foil for the majority of the time. A microwave is not an acceptable substitute.

Excellent post. You are a wonderful writer, so clear and descriptive. Thanks for hosting.
I´ll have to try adding some semolina to the dough, I didn´t find it very interesting as written in the book. But the overall pizza with the confit was very good. Very nice instructions! Thanks for hosting today!
You might try the extended fermentation technique. It is supposed to dramatically improve flavor, and though I haven’t put durum/semolina flour in the sponge, I will the next time I make pizza dough, which will be soon
Fantastic post! I really enjoyed it. And I will have to try the higher gluten flours. Great job hosting!
I hinted at this in the post, but will be more explicit here. If you go with a bread flour, you’ll probably want to hold back more flour than normal, it seems to suck up more water than regular strength flours.
Hi Paul! I wish I had added the semolina — thank you for the suggestion and I will try next time. Thank you for hosting this recipe! Blessings, Catherine
Great info on Steve Sullivan! And is there anything better than a plump, smooth ball of dough ready to be rolled out for pizza? I’m pretty sure there isn’t!
I can think of at least one… a hot pizza ready to be pulled off the stone.
I absolutely agree with you about the reheating. I usually do it unwrapped in the toaster oven.
Great post
The pizza looks good. I don’t think the confit really was supposed to carmelize. I had a nice wide pan, and they still didn’t.
“Thickest stone in the hottest oven” also sums up my pizza philosophy. This was a good crust. I did add some extra water to it, since it seemed a little stiff to me. If you get a chance, Nancy Silverton’s Mozza cookbook has a great dough recipe. It’s similar to this one, except it’s a little wetter and she adds rye flour and barley malt syrup. It’s become my go-to recipe. There’s also some great topping combos.
I’m with Cathy on the Mozza cookbook. I had to add extra water too. And I agree about reheating. It will make an excellent breakfast. Thanks for hosting!!
I was already thinking of Barley Malt Syrup for the next time I make the dough. I have some in Marin, but made the dough for the blog in Southern California. I’ll have to check out the Mozza cookbook from the library. Nancy Silverton turned me onto fennel pollen, though I haven’t made it to the restaurant… yet.
Lucky you to live in CA! We lived in Oregon for 2 years. I still can’t believe how much better the produce is on the West Coast. Here in Maryland, we do okay from May through October, but it’s not the same.
I test-drive most of my cookbooks from the library before buying them, too.
Pingback: Pizza for Dinner « loaves and stitches
Enjoyed reading your post Paul. Nice photos too. 🙂
…will be making this soon…(in addition to other twd recipes I need to get caught up with. Life got in the way….what can I say)
Happy New Year and thanks for hosting!.
Carmen
I enjoyed your writing. I’m glad I found your blog through TWD!
Awesome post, Paul! Very descriptive and informative. Thanks for the tip about the Caputo ‘OO’ flour. I can’t wait to give it a try. Thanks very much for hosting!
Love the cheese addition to the suggested toppings!
You packed in a lot of information! I have also tried the parchment paper trick, especially when working with gluten-free pizza dough which is so delicate. I hadn’t thought of putting the pizza on the stone for a few minutes and then taking it off to add additional ingredients, though. I am wanting to buy durum flour for a baking project, Rosemary Diamante bread, which has a little extra chewiness, so I was interested to read your comments on it. I can’t believe you put two hours into cooking the onions, what a pain!
Pingback: TWD: Onion Confit Pizza « Perfectly-Imperfect Domestic Gal
LOVE the detail to this post. Thank you! I have a pizza dough recipe that I love, and I’m loathe to try new ones. Just might have to. Looks delicious!
Thanks for sharing your thoughts and tips on transferring the pizza to the pizza stone. I failed to track down my peel, so used a flat baking sheet. It was adequate, but definitely limited the size of the pizza. Thanks for hosting this week!
I really enjoyed making this dough, and I equally enjoyed reading this post! I liked the dough as it was, but it’s nice to know that it can be played with and possibly come out better than before. It’s always nice to pick up a new pizza-making tips and tricks, and you really laid them out so they were easy to understand. Thanks for hosting!
I like your idea of parbaking the crust for a few minutes before adding all of the toppings. I’ve had some toppings end up on the oven floor too. I also prefer my onions more carmelized than these were.
Great post Paul. I had a hard time transferring the pizza to the stone – I’ll try your suggestion of pre-baking before topping next time. Lovely job hosting!
Did you ever get a chance to make the baby cakes with the Lyle’s Golden Syrup? Curious as how they turned out.
I did. I made a half recipe with half Lyle’s and half of my remaining “full flavor” molasses. I also adjusted some of the other spices, decreasing cocoa and espresso powder, increasing powdered ginger. The gingerbread cakes were much improved. Yet the full flavor molasses was still a bit much. And for the family in Southern California they were still too strong. Either mild molasses or reducing the molasses to 2/3 cup (1 1/3 cups Lyles) would probably do the trick.
There are a couple things going on that make it difficult to transfer the dough from peel to stone; both are solved with the pre-bake treatment. First is just the sheer weight of a pizza with toppings: the more weight on the crust, the greater the friction between the peel and the dough. Second is timing. Especially with a wetter dough, the longer the dough stays on the peel, the greater the likelihood that it will stick. I don’t move the dough onto the peel until right before I’m ready to bake. And only having to put sauce and a bit of cheese on gets the dough off the peel and onto the stone within a minute or two.
I love reheated pizza! Thanks for hosting this week…it’s great to have a host who’s really familiar with the recipe.
Thanks for your post and helpful insights on making the dough! This is enough to make me consider getting a pizza stone for future efforts.
I am not a sophisticated foodie I must confess. I didn*t like the sweetness of the onions–too sweet for me. Maybe a white onion could be tried.
Thank you for your extra dough notes; I love to bake breads & experiment with doughs-just wish I had easy access to different flour choices. Your pizza looks great- thank you so much for hosting us this week, Paul!
Thank you for taking the time for such a wonderful post! I enjoyed reading all of your tips! Great looking pizza too 🙂
Thanks for hosting this week. I put my dough in the fridge overnight and was very happy with the results. I’ve got some durum flour and will give that a try with my next crust.
Thanks for hosting this week. Great idea to prep. the pizza on the peel and ‘pre-baking’ it for a couple of minutes. Loved your post.
Pingback: {BwJ} Pizza with Onion Confit « Tea and Scones
Enjoyed reading your post! If you use cornmeal on your peel before placing the dough on it you won’t have any problems with it sticking to the peel – usually. It takes a little practice, but is quite fun. Just give it a shake to see if is loose enough if not add more, but it should move around before you add your toppings. Flour usually makes it bitter so go for the cornmeal – or semolina would work. If you get a hole in your dough and sauce leeks through that will make your pizza stick as well. I have used the parchment paper trick before, but it doesn’t get as crisp as I like. I like to get some char on my crust if I can like a good Italian pizza would have that is cooked in a wood fired oven. Also I sometimes par bake my crust without sauce or anything on it and then add my ingredients. The gas grill works great for this too. Just plop the pizza on for a minute on one side. Flip and then top it, close the lid to help cheese melt. Watch for hot spots on the gril though as it can burn. I have used all bread flour before and I find it to be a little too chewy for our taste so I generally stick with unbleached all purpose. Peter Reinhardt’s recipe for neo neopolitan dough on the forno bravo website is a great resource. I never wrap my pizza when reheating in a hot oven. I don’t want it to steam, but stay crisp. But never a microwave touches my pizzas! Happy pizza making!
I always use cornmeal, and if the dough is on the wet side, or the toppings heavy enough it will still stick, even if it was sliding free before toppings. But if it always works for you, more power to you.
I’ll have to try semolina for the peel. The downside of cornmeal is the textural quality; some like it, some don’t. I’m in the latter camp.
I don’t notice the texture of the cornmeal so I guess I don’t mind it and its essential since it acts like ball bearings to help it slide off my peel. Also we take a more traditional Italian approach to topping our pizzas and don’t pile it on so this helps with the weight of the dough and ease of sliding off the peel. Easiest way is to parbake without any sauce or cheese, just need to pop the bubbles that appear. We have any outdoor woodburning pizza oven so we have learned the hard way when all our toppings ended up in the fire instead of on the pie to fall in love with cornmeal 🙂 as we hosts lots of pizza parties.
Oh and I also let my dough ferment 2-2 days in the fridge before making it out to allow the flavors to develop. I think it makes a world of difference. I have also substituted 1 cup of whole wheat flour for the white flour.
I reheated mine as well in my toaster oven and it was perfect! Thanks for hosting and for such an informative post!
Is the measurement for water 1 1/2 cups? It didn’t specify in the sponge if the measure was in cups, but I’m thinking it was.
Sharp eye. It is indeed 1 1/2 cups water. I’ve updated the post to reflect that.
Thanks!
Paul, I just found your blog through Paula at Vintage Kitchen Notes and am very much looking forward to following you and your recipes! ~ David from cocoaandlavender.blogspot.com
Hi Paul, I keep planning to get back into TwD but I’m still pretty hit and miss:) Your post makes me want to make this pizza though! Maybe I’ll actually get it done:) Nice job!
Great post.
I agree – a 500+ oven with a thick stone makes the best crust (glad to know I am not the only one that pulls the parchment part way through the bake)
I included the parchment pull trick figuring many of the pizza newbies would find it helpful — or be scared off by singed paper. I almost always go with the twice-baked approach, though in the last week I’ve ended up with two very misshapen pizzas when a new and very wet dough really stuck on the peel, despite an abundance of coarse semolina to grease the skids, as it were.
Pingback: TWD: Pizza with Onion Confit AND French Apple Tart | Fresh From ...